Hardware and Network Troubleshooting · Topic 1 of 7
Troubleshooting Methodology and Tools
Learn the six step CompTIA troubleshooting method and basic tools such as multimeters, power supply testers and loopback plugs used in every scenario.
- 5 min
- Includes a diagram
- The six steps are identify, theory, test, plan and implement, verify, document.
- Question the user and ask what changed before touching anything.
- Start with simple and obvious causes.
What it is
Troubleshooting is the structured work of finding why something fails and fixing it. CompTIA expects the same ordered method for every problem, from a dead laptop to a slow network.
Following the steps prevents random part swapping, protects the user's data and leaves a record for the next technician. This page gives the method and the common tools. The later pages apply it to specific symptoms.
How it works
The six steps
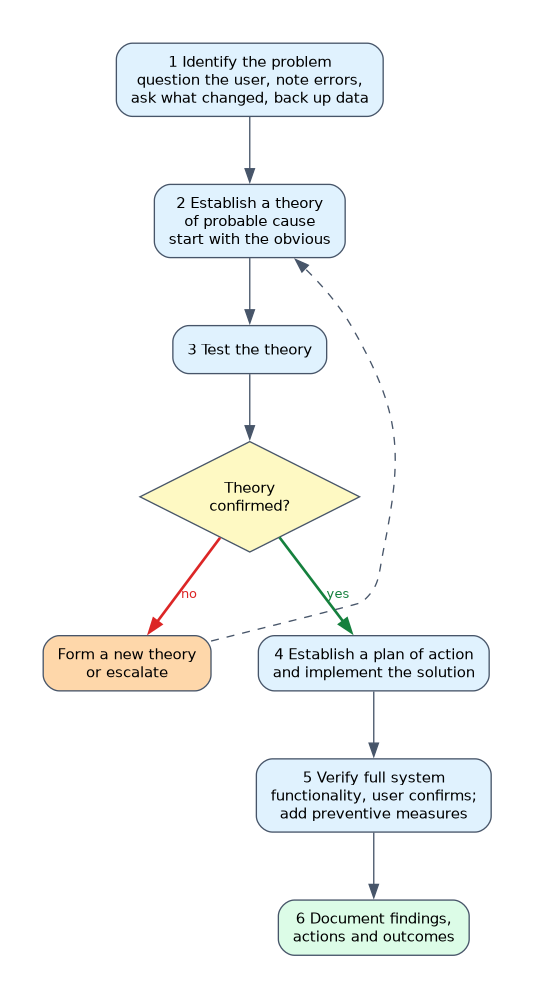
| Step | What you do |
|---|---|
| 1. Identify the problem | Gather information, question the user, note error messages, ask what changed, back up data if needed, and try to reproduce the problem. Handle several problems one at a time |
| 2. Establish a theory of probable cause | Start with the obvious (power, cables, settings). Consider several possible causes and research if needed |
| 3. Test the theory | Confirm or reject the cause. If it is confirmed, plan the next step. If not, form a new theory or escalate to someone with more skill or authority |
| 4. Establish a plan of action and implement the solution | Think about the effect on the user, the business and company policy, then carry out the fix. Get approval for changes where policy requires it |
| 5. Verify full system functionality | Confirm the system works and the user agrees. Add preventive measures where useful |
| 6. Document findings, actions and outcomes | Record the problem, cause, fix and result |
The order matters. Documentation comes last, and no fix is complete until the user confirms that the problem is gone.
Step 1 in practice
Good questions save time.
- What is not working, and when did it start?
- What changed recently: new hardware, an update, a move or a spill?
- Does the problem happen every time or only sometimes?
- Are others affected?
- Did anything display an error message or make a sound?
Look at the device itself, such as indicator lights, loose cables and signs of damage. Remember the safe actions: do not make changes that could destroy data before a backup.
Step 2 and 3: theory and test
Begin with simple causes. A device that will not turn on may just be unplugged. Test one change at a time so you know which one worked.
If the theory is wrong, do not give up. Try the next most likely cause. If you cannot find the cause, escalate with clear notes on what you tried.
Steps 4 and 5: fix and verify
Before you act, consider whether the fix could cause other problems or break company rules. Take a backup before replacing storage or changing settings that could lose data.
After the fix, test the whole system, not only the part you changed. Ask the user to confirm. Preventive measures include cleaning dust, updating firmware, labelling cables and training the user.
Step 6: documentation
Write what the problem was, what you tested, what fixed it and how long it took. The record helps with repeat problems and supports reports and billing.
When a question asks for the next step after a fix works, look for "verify full system functionality" before "document", since verification comes first.
Common hardware tools
| Tool | Use |
|---|---|
| Screwdrivers, plastic pry tools | Open cases without damage |
| Multimeter | Measures voltage, resistance and continuity, for example on a power supply output or a cable |
| Power supply tester | Quick check of the power supply connectors and their voltages |
| Loopback plug | Tests a network or serial port by sending its signal back |
| Cable tester | Finds opens, shorts and miswired network cables |
| Compressed air | Clears dust from fans, vents and heat sinks |
| Electrostatic discharge (ESD) strap and mat | Prevent static damage |
| Known good parts | Swap in a part that is certain to work to test a theory |
| Power on self test (POST) diagnostic card | Reads error codes when the computer does not start |
Swapping a known good part is one of the fastest tests, but do it only with power off and with proper care.
What to remember for the exam
- The six steps are identify, theory, test, plan and implement, verify, document.
- Question the user and ask what changed before touching anything.
- Start with simple and obvious causes.
- If a theory fails, form a new theory or escalate.
- Consider policy, impact and backups before you change anything.
- Verify full functionality, and add preventive measures, before documenting.
- A multimeter measures voltage, resistance and continuity.
- Use ESD protection when handling internal parts.
Common mistakes
Jumping to a fix. Replacing parts without a theory wastes time and money.
Changing several things at once. You cannot tell which change helped.
Skipping verification. A fix is not done until the whole system works and the user agrees.
Not documenting. The next technician repeats your steps without your notes.
Forgetting the backup. Data may be lost if a repair goes wrong.
Check yourself
Which step comes immediately before documenting?
Verify full system functionality, and add preventive measures.
What should you do if your theory of probable cause is not confirmed?
Establish a new theory or escalate the problem.
Which tool measures voltage, resistance and continuity?
A multimeter.
Topic 1 of 7 in Hardware and Network Troubleshooting
Test yourself on Hardware and Network Troubleshooting
The full CompTIA A+ 220-1201 question bank has 856 questions, with timed practice exams and an explanation for every answer.
This study guide is independent and is not affiliated with, endorsed by, or sponsored by CompTIA. Vendor names, certification names and exam codes are trademarks of their respective owners and are used for identification only.