Incident Response · Topic 4 of 5
Compromised Workload Forensics
Isolate and preserve a compromised EC2 instance, container or Lambda function, capture snapshots and memory, and analyse evidence in a forensic account.
- 6 min
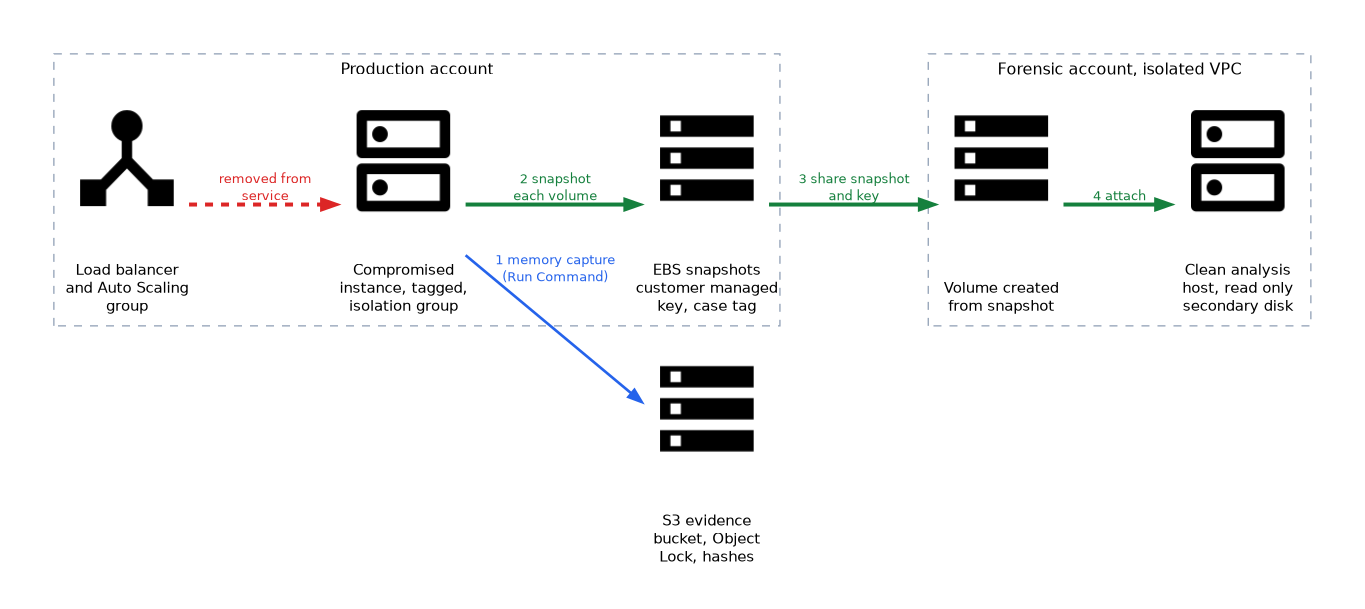
- Includes a diagram
- Isolate rather than terminate. Evidence in memory and on disk is lost on termination.
- Replace the security groups with an isolation group, and remember that already established connections may survive until a network ACL or other cut off.
- Detach the instance from its Auto Scaling group or put it on standby, otherwise the group may replace it.
What it is
When an EC2 instance, container or function is compromised, you want to stop the damage without destroying evidence. Containment limits the spread, and forensics gathers proof of what happened so that you can find the root cause.
The key tension is speed against preservation. Terminating a host stops the attack, but it also erases memory and may remove the disk.
How it works
Order of volatility
Collect the most volatile data first. Memory and running processes vanish at shutdown, then comes network state, then disk, then logs held elsewhere.
On AWS the practical order is: tag the instance, isolate it, capture memory if you need it, snapshot the volumes, and only then stop or replace it.
Step 1: contain
| Action | Detail |
|---|---|
| Tag the instance | Mark it as under investigation, so no one reuses it |
| Change the security group | Replace its groups with an isolation group that has no inbound rules and with the default outbound rule removed |
| Remove from service | Deregister it from the load balancer, and detach or put it on standby in its Auto Scaling group, so the group does not replace it and destroy the evidence |
| Deny the role | Revoke sessions on the instance role and attach a deny policy |
| Enable termination protection | Prevents accidental termination during the investigation |
Security groups track connections. After you switch to an isolation group, connections that were already established can continue until they end, so also use a network ACL (access control list) to cut them if needed, or take the instance off the network by other means.
# AWS CLI: apply an isolation security group to the instance's network interface
aws ec2 modify-instance-attribute --instance-id i-0123456789abcdef0 \
  --groups sg-0aaaabbbbccccdddd
The command replaces all security groups on the instance with the one you list, which here has no allow rules. Keep the instance running if you still need its memory.
Step 2: preserve evidence
# AWS CLI: snapshot every attached volume, with a tag for chain of custody
aws ec2 create-snapshot --volume-id vol-0123456789abcdef0 \
  --description "IR-1042 disk image" \
  --tag-specifications 'ResourceType=snapshot,Tags=[{Key=case,Value=IR-1042}]'
Memory is captured with a tool run on the instance, for example through Systems Manager Run Command, and written to a protected S3 bucket. Record hashes of evidence files and who handled them, which is the chain of custody. Store evidence in a bucket with Object Lock and restricted access.
GuardDuty Malware Protection for EC2 can scan the volumes of an instance when a finding suggests malware. It supports triage, but it does not replace a full forensic copy.
Step 3: analyse in a forensic environment
!In the production account the compromised instance is removed from the load balancer and Auto Scaling group and isolated; memory goes to a locked S3 evidence bucket, volumes are snapshotted, and the snapshot and key are shared to a forensic account where a volume from it is attached read only to a clean analysis host. Do not analyse on the compromised host. Share the snapshot to a dedicated forensic account, create a volume from it, and attach it as a secondary, read only disk on a clean analysis instance in an isolated VPC.
| Snapshot encryption | Sharing consequence |
|---|---|
| Unencrypted | Can be shared with another account directly |
| Encrypted with the AWS managed EBS key | Cannot be shared, copy it with a customer managed key first |
| Encrypted with a customer managed key | Share the snapshot, and allow the forensic account to use the key |
Combine the disk analysis with logs: CloudTrail for API actions, VPC flow logs and DNS query logs for network behaviour, and GuardDuty findings for the timeline.
Containers and functions
- Amazon EKS or ECS. Isolate the pod or task with a network policy or security group, keep the node if needed, and collect container logs and the image. Cordon the node to stop new pods landing on it.
- AWS Lambda. Set reserved concurrency to zero to stop invocations, and review the function code, its role and its layers. Publish a new version without the bad code.
- Amazon S3 data exposure. Enable Block Public Access, review the bucket policy and access logs, and use Macie to see what sensitive data was exposed.
Step 4: eradicate and recover
Rebuild from a known good image or infrastructure as code. Do not clean the old host and put it back. Patch the entry point, rotate credentials the host could reach, and confirm in monitoring that the new instance behaves normally before closing the incident.
What to remember for the exam
- Isolate rather than terminate. Evidence in memory and on disk is lost on termination.
- Replace the security groups with an isolation group, and remember that already established connections may survive until a network ACL or other cut off.
- Detach the instance from its Auto Scaling group or put it on standby, otherwise the group may replace it.
- Capture memory before shutdown, then snapshot the EBS volumes.
- Analyse a copy of the volume in a separate forensic account and VPC, never on the compromised host.
- To share an encrypted snapshot, use a customer managed key and give the other account key access.
- Use tags, hashes and a locked evidence bucket to keep chain of custody.
- Rebuild from a trusted image after the investigation.
When a question offers "terminate the instance immediately" next to "isolate it and take a snapshot", the second option is nearly always the one that preserves evidence.
Common mistakes
Stopping the instance too early. Stopping loses memory contents, and the attacker's running processes disappear with them.
Forgetting the Auto Scaling group. The group sees an unhealthy host, terminates it and launches a replacement, which destroys the evidence.
Working on the original disk. Any change on the compromised host alters the evidence, so work on a copy.
Sharing a snapshot encrypted with the AWS managed key. That key cannot be shared, so the copy step with a customer managed key is required.
Changing the instance's security group does not always end connections that already exist, so confirm in flow logs that the attacker traffic has actually stopped.
Check yourself
What replaces the security groups on a compromised instance?
An isolation security group with no inbound rules and no outbound rules, after the default outbound rule is removed.
Why detach the instance from its Auto Scaling group?
So the group does not terminate and replace the instance, which would destroy the evidence.
How do you analyse an encrypted EBS snapshot in another account?
Copy it with a customer managed key, share the snapshot and the key access, then create a volume in the forensic account.
Topic 4 of 5 in Incident Response
Test yourself on Incident Response
The full AWS SCS-C03 question bank has 858 questions, with timed practice exams and an explanation for every answer.
This study guide is independent and is not affiliated with, endorsed by, or sponsored by AWS. Vendor names, certification names and exam codes are trademarks of their respective owners and are used for identification only.