OSI Layer Attacks · Topic 4 of 5
FTP, Telnet and SSH Brute Force Prevention
Learn how brute force logins on FTP, telnet and SSH work, and how to stop them on MikroTik with staged address lists, limits, SSH keys and closed services.
- 5 min
- Includes a diagram
- Brute force tries many passwords against FTP, telnet or SSH.
- FTP uses port 21, SSH port 22 and telnet port 23.
- FTP and telnet send passwords in clear text and should be disabled.
What it is
A brute force attack tries many passwords against a login service until one works.
The targets are services that accept a username and a password. On a router these are FTP, telnet and SSH, and the attacker only needs an open port.
The attacker uses lists of common passwords and automated tools. A router with a weak password and an open service on the internet is often found within hours.
How it works
Each defence either removes the target, makes guessing slower, or blocks the guesser after a few tries.
The three services
| Service | Port | Note |
|---|---|---|
| FTP | 21 | Sends the password in clear text |
| Telnet | 23 | Sends the password in clear text |
| SSH | 22 | Encrypted, but still open to guessing |
FTP and telnet should be switched off. Use SSH and a secure file transfer instead.
/ip service disable telnet,ftpReduce the exposure
The best defence is that the attacker cannot reach the login at all. Limit the service to trusted addresses and block it on the WAN.
/ip service set ssh address=192.168.88.0/24
/ip firewall filter add chain=input in-interface-list=WAN protocol=tcp dst-port=22 action=drop
You can also change the service port, which hides it from simple scans but does not stop a determined attacker.
/ip service set ssh port=2222Use keys and strong passwords
A long passphrase or a public key makes guessing practically impossible. Key based login also removes the password from the attack surface.
/user ssh-keys import public-key-file=admin-key.pub user=netopsBlock repeat offenders with stages
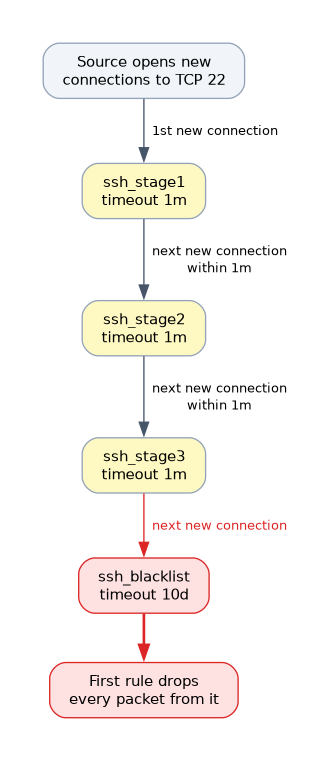 If SSH must be open to the internet, count the attempts. A source that connects too often in a short time is added to a blacklist.
The classic method uses a chain of address lists, called stages. Each new connection moves the source to the next stage, and the last stage leads to the blacklist.
/ip firewall filter add chain=input protocol=tcp dst-port=22 src-address-list=ssh_blacklist action=drop
/ip firewall filter add chain=input protocol=tcp dst-port=22 connection-state=new src-address-list=ssh_stage3 action=add-src-to-address-list address-list=ssh_blacklist address-list-timeout=10d
/ip firewall filter add chain=input protocol=tcp dst-port=22 connection-state=new src-address-list=ssh_stage2 action=add-src-to-address-list address-list=ssh_stage3 address-list-timeout=1m
/ip firewall filter add chain=input protocol=tcp dst-port=22 connection-state=new src-address-list=ssh_stage1 action=add-src-to-address-list address-list=ssh_stage2 address-list-timeout=1m
/ip firewall filter add chain=input protocol=tcp dst-port=22 connection-state=new action=add-src-to-address-list address-list=ssh_stage1 address-list-timeout=1m
/ip firewall filter add chain=input protocol=tcp dst-port=22 action=accept
Read the list from the top. The first rule drops sources that are already blacklisted. The stage rules are written in reverse order, from the highest stage to the lowest.
A new connection first lands the source in stage 1. Another new connection within a minute moves it to stage 2, then stage 3, and the next one adds it to the blacklist. A real user who logs in once never gets that far.
The final accept rule only lets the connection in when it was not dropped earlier. The timeouts are examples, so tune them to your needs.
Order matters
Place the whole group above the general accept rule for SSH. If an earlier rule already accepts port 22, the staged rules never see the traffic.
The same method for FTP and telnet
You can copy the pattern by changing dst-port to 21 for FTP or 23 for telnet. If you can, disable these services and avoid the extra rules.
Checking the result
/ip firewall address-list print where list=ssh_blacklist
/log print where message~"login failure"
The first command shows the blocked sources. The second shows failed login attempts in the log.
Always turn the service off, limit it by address or use keys before you add blacklist rules. Fewer exposed doors beat a long rule list.
What to remember for the exam
Seven facts cover brute force defence.
- Brute force tries many passwords against FTP, telnet or SSH.
- FTP uses port 21, SSH port 22 and telnet port 23.
- FTP and telnet send passwords in clear text and should be disabled.
- Limit services by address and block them on the WAN where possible.
- SSH keys and strong passwords make guessing impractical.
- Staged address lists with timeouts move a source to a blacklist after repeated new connections.
- Put the blacklist and stage rules above the accept rule for the service.
Common mistakes
Four mistakes are common.
Writing the stages in the wrong order. The rule that adds a source to stage 1 must come last, or it matches every new connection first and the source never moves up.
Putting the accept rule first. The staged rules are never reached, and the attack goes on.
Relying only on a changed port. A port scan finds the new port quickly. It adds a little cover and not real security.
Blacklisting your own address. Repeated new connections from your own address, for example from a script, can add you to the list. Keep a trusted management address list that is accepted first.
A long timeout on the blacklist can lock out a user for days. Keep a second way into the router, such as the console.
Check yourself
Work through these three questions.
Why should telnet and FTP be disabled?
They send passwords in clear text. Use SSH instead.
How do the staged address list rules block a brute force attack?
Each new connection moves the source to the next stage, and the last stage adds it to the blacklist. A rule at the top drops all blacklisted sources.
Why must the blacklist and stage rules sit above the SSH accept rule?
If the accept rule is first, the traffic matches it and never reaches the staged rules.
Topic 4 of 5 in OSI Layer Attacks
Test yourself on OSI Layer Attacks
The full MikroTik MTCSE question bank has 446 questions, with timed practice exams and an explanation for every answer.
This study guide is independent and is not affiliated with, endorsed by, or sponsored by MikroTik. Vendor names, certification names and exam codes are trademarks of their respective owners and are used for identification only.